Preamble
This guide shows how to passthrough a gpu to a vm running on QEMU/KVM on linux for improved graphical performance. In my case, I did it to run windows and play games while I can still work on my linux machine. Dual booting is not a good solution in this case as rebooting into windows just for the purpose of gaming is a pain. Passing through my gpu, I can switch between games and work with muxh ease. This is a guide of how I set it up on my machine running Debian 10.
Introduction to VFIO and PCI passthrough:
Virtual Function IO (or VFIO) allows a virtual machine (VM) direct access to a pci hardware resource, such as a graphics processing unit (GPU). Virtual machines with set up GPU passthrough can gain close to bare metal performance, which makes running games in a Windows virtual machine possible.
Unfortunately, the setup process can be pretty complex. It consists of fixed base settings, some variable settings and several optional (mostly performance) settings. In order to sustain readability of this post, and because I aim to use the virtual machine for gaming only, I minimized the variable parts for latency optimization. The variable topics itself are linked in articles – I hope this makes sense. 🙂
Requirements:
Hardware:
In order to successfully follow this guide, it is mandatory that the used hardware supports virtualization and IOMMU groups.
The hardware I use is as follows: * Ryzen 6 2600 @ 4.00Ghz * MSI X470 Gaming Plus * 24gb corsair vengeance 3200Mhz cl16 RAM * 240GB WD Green SSD for vm * NVIDIA GT710 (host gpu) * AMD Radeon RX580 (passthrough gpu)
Software:
Before we start, install the virtualization manager and related software via:
sudo apt-get install libvirt-bin bridge-utils virt-manager qemu-kvm ovmfSetting up the vfio ryzen passthrough:
Devices connected to the mainboard, are members of (IOMMU) groups – depending on where and how they are connected. It is possible to pass devices into a virtual machine. Passed through devices have nearly bare metal performance when used inside the VM.
On the downside, passed through devices are isolated and thus no longer available to the host system. Furthermore it is only possible to isolate all devices of one IOMMU group at the same time. This means, even when not used in the VM if a devices is IOMMU-group sibling of a passed through device, it can not be used on the host system.
Enabling the IOMMU feature:
To enable the IOMMU feature on an AMD Ryzen system, modify your grub
config. Run sudo nano /etc/default/grub and edit the line
which starts with GRUB_CMDLINE_LINUX_DEFAULT, to match:
GRUB_CMDLINE_LINUX_DEFAULT="amd_iommu=on iommu=pt kvm_amd.npt=1 kvm_amd.avic=1"in case you are using an Intel CPU the line should read:
GRUB_CMDLINE_LINUX_DEFAULT="intel_iommu=on"Save the changes and update grub.
sudo update-grubReboot your system when the command has finished.
One can verify after a system start if IOMMU is enabled by running:
dmesg |grep AMD-ViMy output:
[    0.758804] AMD-Vi: IOMMU performance counters supported
[    0.760735] AMD-Vi: Found IOMMU at 0000:00:00.2 cap 0x40
[    0.760737] AMD-Vi: Extended features (0xf77ef22294ada):
[    0.760741] AMD-Vi: Interrupt remapping enabled
[    0.760742] AMD-Vi: virtual APIC enabled
[    0.760832] AMD-Vi: Lazy IO/TLB flushing enabled
Finding the iommu group of the guest gpu to isolate:
In order to activate the hardware passthrough for virtual machines, we have to make sure the nvidia/amd driver is not taking ownership of the PCIe devices; isolate it before we can hand it over.
This is done by applying the vfio-pci to the guest GPU, during the system startup.
Depending on the PCIe slot installed, the hardware has different IOMMU group affilation. One can use a bash script like this in order to determine devices and their grouping:
#!/bin/bash
shopt -s nullglob
for d in /sys/kernel/iommu_groups/*/devices/*; do
    n=${d#*/iommu_groups/*}; n=${n%%/*}
    printf 'IOMMU Group %s ' "$n"
    lspci -nns "${d##*/}"
done;
Output:
IOMMU Group 0 00:01.0 Host bridge [0600]: Advanced Micro Devices, Inc. [AMD]
Family 17h PCIe Dummy Host Bridge [1022:1452]
IOMMU Group 10 00:08.1 PCI bridge [0604]: Advanced Micro Devices, Inc. [AMD]
Family 17h Internal PCIe GPP Bridge 0 to Bus B [1022:1454]
IOMMU Group 11 00:14.0 SMBus [0c05]: Advanced Micro Devices, Inc. [AMD] FCH
SMBus Contro(rev 59)
IOMMU Group 11 00:14.3 ISA bridge [0601]: Advanced Micro Devices, Inc. [AMD]
FCH LPC Brirev 51)
IOMMU Group 12 00:18.0 Host bridge [0600]: Advanced Micro Devices, Inc. [AMD]
Family 17h Data Fabric: Device 18h; Function 0 [1022:1460]
IOMMU Group 12 00:18.1 Host bridge [0600]: Advanced Micro Devices, Inc. [AMD]
Family 17h Data Fabric: Device 18h; Function 1 [1022:1461]
IOMMU Group 12 00:18.2 Host bridge [0600]: Advanced Micro Devices, Inc. [AMD]
Family 17h Data Fabric: Device 18h; Function 2 [1022:1462]
IOMMU Group 12 00:18.3 Host bridge [0600]: Advanced Micro Devices, Inc. [AMD]
Family 17h Data Fabric: Device 18h; Function 3 [1022:1463]
IOMMU Group 12 00:18.4 Host bridge [0600]: Advanced Micro Devices, Inc. [AMD]
Family 17h Data Fabric: Device 18h; Function 4 [1022:1464]
IOMMU Group 12 00:18.5 Host bridge [0600]: Advanced Micro Devices, Inc. [AMD]
Family 17h Data Fabric: Device 18h; Function 5 [1022:1465]
IOMMU Group 12 00:18.6 Host bridge [0600]: Advanced Micro Devices, Inc. [AMD]
Family 17h Data Fabric: Device 18h; Function 6 [1022:1466]
IOMMU Group 12 00:18.7 Host bridge [0600]: Advanced Micro Devices, Inc. [AMD]
Family 17h Data Fabric: Device 18h; Function 7 [1022:1467]
IOMMU Group 13 03:00.0 USB controller [0c03]: Advanced Micro Devices, Inc.
[AMD] Device 01)
IOMMU Group 13 03:00.1 SATA controller [0106]: Advanced Micro Devices, Inc.
[AMD] 400 Se Controller [1022:43c8] (rev 01)
IOMMU Group 13 03:00.2 PCI bridge [0604]: Advanced Micro Devices, Inc. [AMD]
400 Series ge [1022:43c6] (rev 01)
IOMMU Group 13 16:00.0 PCI bridge [0604]: Advanced Micro Devices, Inc. [AMD]
400 Series  [1022:43c7] (rev 01)
IOMMU Group 13 16:01.0 PCI bridge [0604]: Advanced Micro Devices, Inc. [AMD]
400 Series  [1022:43c7] (rev 01)
IOMMU Group 13 16:02.0 PCI bridge [0604]: Advanced Micro Devices, Inc. [AMD]
400 Series  [1022:43c7] (rev 01)
IOMMU Group 13 16:03.0 PCI bridge [0604]: Advanced Micro Devices, Inc. [AMD]
400 Series  [1022:43c7] (rev 01)
IOMMU Group 13 16:04.0 PCI bridge [0604]: Advanced Micro Devices, Inc. [AMD]
400 Series  [1022:43c7] (rev 01)
IOMMU Group 13 16:08.0 PCI bridge [0604]: Advanced Micro Devices, Inc. [AMD]
400 Series  [1022:43c7] (rev 01)
IOMMU Group 13 18:00.0 Ethernet controller [0200]: Realtek Semiconductor Co.,
Ltd. RTL81Express Gigabit Ethernet Controller [10ec:8168] (rev 15)
IOMMU Group 13 1c:00.0 USB controller [0c03]: ASMedia Technology Inc. ASM1143
USB 3.1 Ho21:1343]
IOMMU Group 14 1d:00.0 VGA compatible controller [0300]: NVIDIA Corporation
GK208 [GeFor:128b] (rev a1)
IOMMU Group 14 1d:00.1 Audio device [0403]: NVIDIA Corporation GK208 HDMI/DP
Audio Contr (rev a1)
IOMMU Group 15 1e:00.0 VGA compatible controller [0300]: Advanced Micro
Devices, Inc. [A [Radeon RX 470/480] [1002:67df] (rev e7)
IOMMU Group 15 1e:00.1 Audio device [0403]: Advanced Micro Devices, Inc.
[AMD/ATI] EllesRadeon RX 470/480 / 570/580/590] [1002:aaf0]
IOMMU Group 16 1f:00.0 Non-Essential Instrumentation [1300]: Advanced Micro
Devices, IncRaven/Raven2 PCIe Dummy Function [1022:145a]
IOMMU Group 17 1f:00.2 Encryption controller [1080]: Advanced Micro Devices,
Inc. [AMD] s 00h-0fh) Platform Security Processor [1022:1456]
IOMMU Group 18 1f:00.3 USB controller [0c03]: Advanced Micro Devices, Inc.
[AMD] USB 3.0[1022:145f]
IOMMU Group 19 20:00.0 Non-Essential Instrumentation [1300]: Advanced Micro
Devices, IncRenoir PCIe Dummy Function [1022:1455]
IOMMU Group 1 00:01.3 PCI bridge [0604]: Advanced Micro Devices, Inc. [AMD]
Family 17h (CIe GPP Bridge [1022:1453]
IOMMU Group 20 20:00.2 SATA controller [0106]: Advanced Micro Devices, Inc.
[AMD] FCH SACI mode] [1022:7901] (rev 51)
IOMMU Group 21 20:00.3 Audio device [0403]: Advanced Micro Devices, Inc. [AMD]
Family 17) HD Audio Controller [1022:1457]
IOMMU Group 2 00:02.0 Host bridge [0600]: Advanced Micro Devices, Inc. [AMD]
Family 17h PCIe Dummy Host Bridge [1022:1452]
IOMMU Group 3 00:03.0 Host bridge [0600]: Advanced Micro Devices, Inc. [AMD]
Family 17h PCIe Dummy Host Bridge [1022:1452]
IOMMU Group 4 00:03.1 PCI bridge [0604]: Advanced Micro Devices, Inc. [AMD]
Family 17h (CIe GPP Bridge [1022:1453]
IOMMU Group 5 00:03.2 PCI bridge [0604]: Advanced Micro Devices, Inc. [AMD]
Family 17h (CIe GPP Bridge [1022:1453]
IOMMU Group 6 00:04.0 Host bridge [0600]: Advanced Micro Devices, Inc. [AMD]
Family 17h PCIe Dummy Host Bridge [1022:1452]
IOMMU Group 7 00:07.0 Host bridge [0600]: Advanced Micro Devices, Inc. [AMD]
Family 17h PCIe Dummy Host Bridge [1022:1452]
IOMMU Group 8 00:07.1 PCI bridge [0604]: Advanced Micro Devices, Inc. [AMD]
Family 17h (nternal PCIe GPP Bridge 0 to Bus B [1022:1454]
IOMMU Group 9 00:08.0 Host bridge [0600]: Advanced Micro Devices, Inc. [AMD]
Family 17h PCIe Dummy Host Bridge [1022:1452]
We are looking for the device id of the guest GPU (in my case, Radeon RX 470/480) for isolation. Keep in mind that the GPU usually comes combined with an audio device.
We will isolate the GPU in PCIe slot 2, with host gpu in PCIe slot 1.
For the next step only the GPU-Id is needed. We have to isolate
1002:67df and 1002:aaf0
Isolation of guest gpu
In order to isolate the gfx card modify
/etc/initramfs-tools/modules via:
sudo nano /etc/initramfs-tools/modules and add:
softdep amdgpu pre: vfio vfio_pci
vfio vfio_iommu_type1 vfio_virqfd vfio_pci ids=1002:67df,1002:aaf0
modify /etc/modules aswell via:
sudo nano /etc/modules and add:
vfio
vfio_iommu_type1
vfio_pci ids=1002:67df,1002:aaf0
These changes will pass device-ids to the vfio_pci module, in order to reserve these devices for the passthrough. It is crucial that the vfio_pci module claims the GPU before the actual driver (in this case the nvidia graphic-cards driver) loads, otherwise it is not possible to isolate the GPU. Make sure your cards are using the Nvidia driver (not nouvea one).
In order to alter the load sequence in favour to vfio_pci before the
nvidia driver, create a file in the modprobe.d folder via
sudo nano /etc/modprobe.d/nvidia.conf and add the the
following line:
softdep nouveau pre: vfio-pci
softdep nvidia pre: vfio-pci
softdep nvidia* pre: vfio-pci
Create another file via
sudo nano /etc/modprobe.d/vfio.conf to add the the
following line:
options vfio-pci ids=1002:67df,1002:aaf0Obviously, the ids have to be the same we have added before to the modules file. Now save and close the file.
Since the Windows 10 update 1803 the following additional entry needs
to be set (otherwise BSOD) create the kvm.conf file
viasudo nano /etc/modprobe.d/kvm.conf to add the the
following line:
options kvm ignore_msrs=1Save and close the file.
when all is done run: sudo update-initramfs -u -k allVerify the isolation
In order to verify a proper isolation of the device, run:
lspci -nnvfind the line "Kernel driver in use" for the GPU and its
audio part. It should state vfio-pci.
My output:
1e:00.0 VGA compatible controller [0300]: Advanced Micro Devices, Inc.
[AMD/ATI] Ellesmere [Radeon RX 470/480] [1002:67df] (rev e7) (prog-if 00 [VGA
controller])
        Subsystem: Sapphire Technology Limited Ellesmere [Radeon RX
470/480/570/570X/580/580X/590] (Nitro+ Radeon RX 570/580) [1da2:e366]
        Flags: fast devsel, IRQ 11
        Memory at d0000000 (64-bit, prefetchable) [disabled] [size=256M]
        Memory at e0000000 (64-bit, prefetchable) [disabled] [size=2M]
        I/O ports at d000 [disabled] [size=256]
        Memory at f7900000 (32-bit, non-prefetchable) [disabled] [size=256K]
        Expansion ROM at f7940000 [disabled] [size=128K]
        Capabilities: <access denied>
        Kernel driver in use: vfio-pci
        Kernel modules: amdgpu

1e:00.1 Audio device [0403]: Advanced Micro Devices, Inc. [AMD/ATI] Ellesmere
HDMI Audio [Radeon RX 470/480 / 570/580/590] [1002:aaf0]
        Subsystem: Sapphire Technology Limited Ellesmere HDMI Audio [Radeon RX
470/480 / 570/580/590] [1da2:aaf0]
        Flags: fast devsel, IRQ 10
        Memory at f7960000 (64-bit, non-prefetchable) [disabled] [size=16K]
        Capabilities: <access denied>
        Kernel driver in use: vfio-pci
        Kernel modules: snd_hda_intel
Creating the windows virtual machine
The virtualization is done via an open source machine emulator and virtualizer called QEMU. One can either run qemu directly, or use a GUI called virt-manager in order setup, and run a virtual machine. I prefer using the GUI. Unfortunately not every settings is supported in the Virtual Manager. Thus, I define the basic settings in the UI do a quick VM start and force stop it right after I see the GPU is passed-over correctly. Afterwards one can edit the missing bits into the VM config via virsh.
Open
virt-manager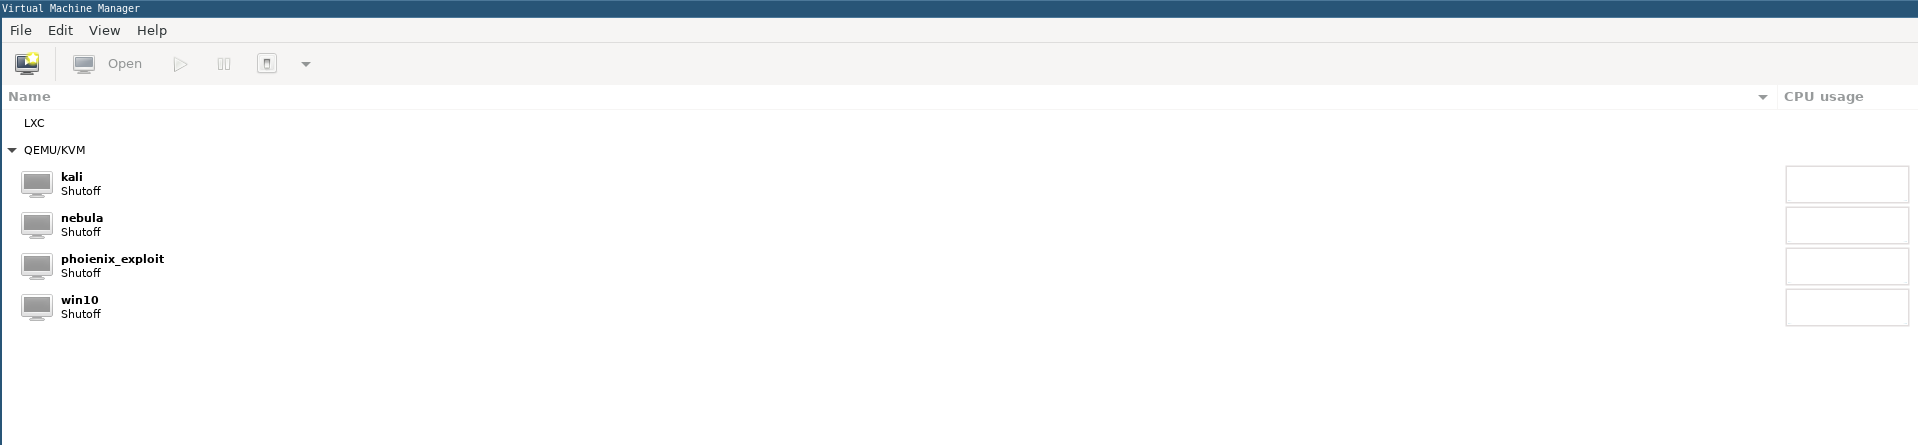
Create a new windows virtual machine
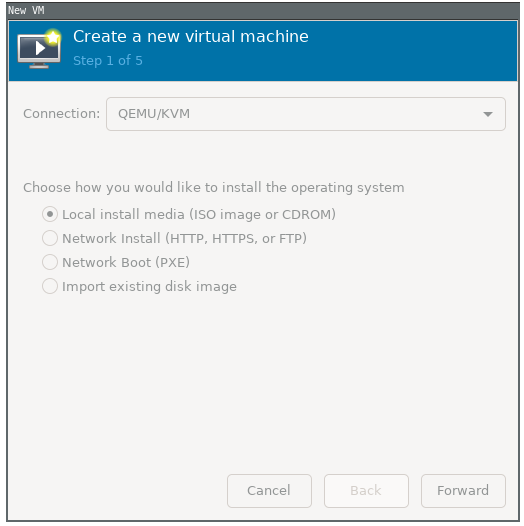
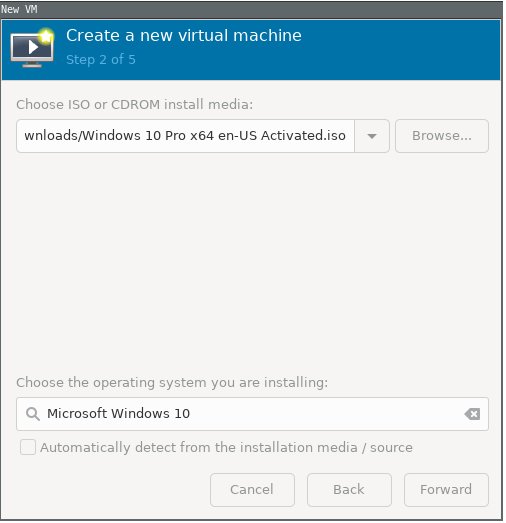
Select the iso file of windows10
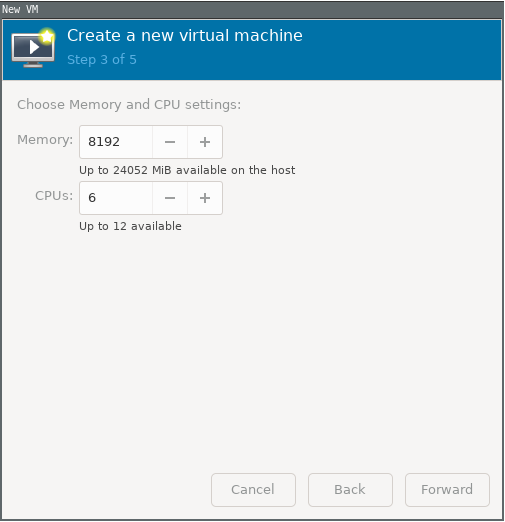
Choose the desired amount of RAM and CPU cores
Create a custom storage(since we are using a wholess SSD for this vm)
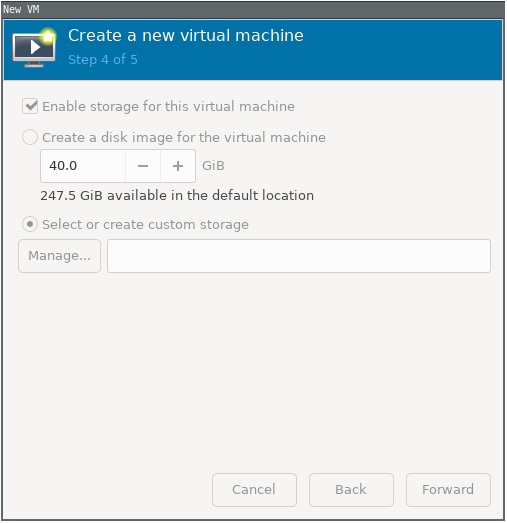
Add a new pool
First, find the dev name of your ssd for vm using the command
lsblkin terminal. In my case, it was /dev/sdc. You must select physical disk drive as we are using a seperate disk.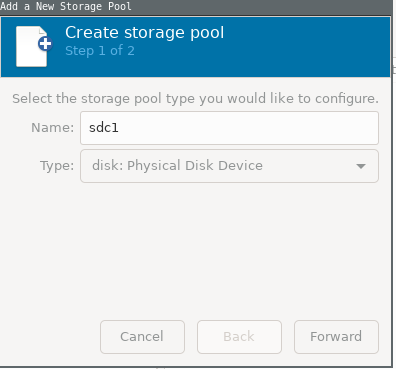
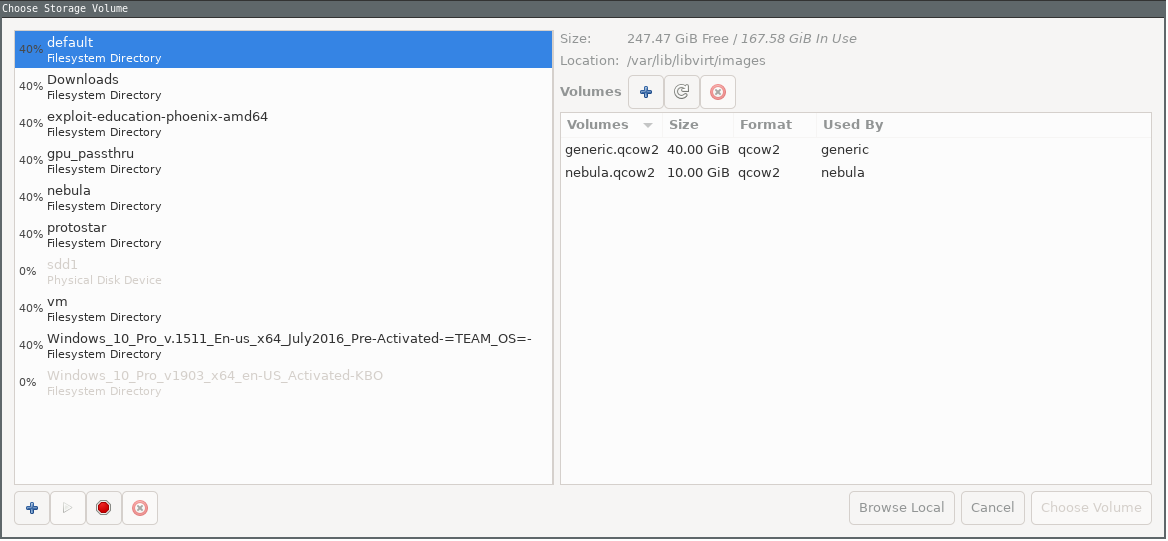
Build the pool

Next create a new volume in the pool by the name
win10(or whatever you like). and select this voilume as the storage.You must check the box

After finishing, the following box will appear. Select chipset
Q35and firmwareuefiand apply.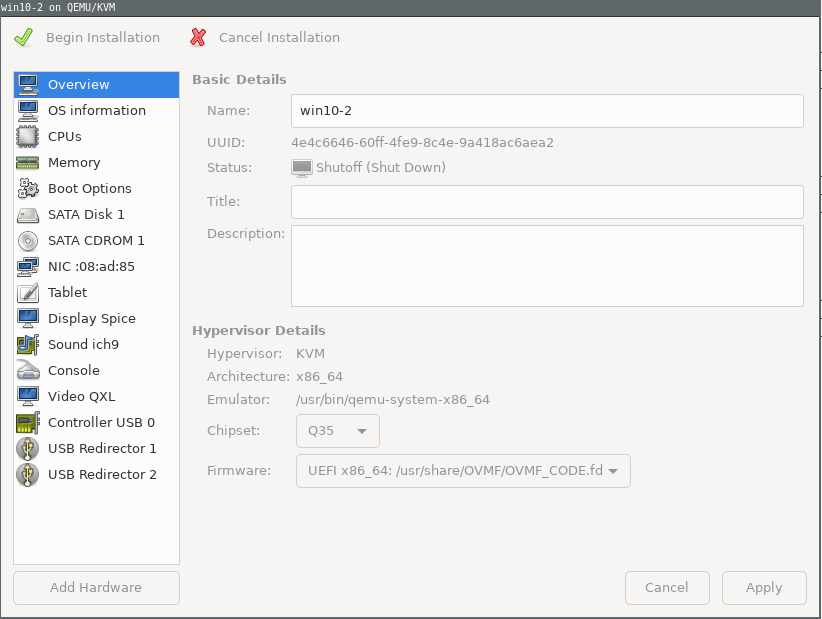
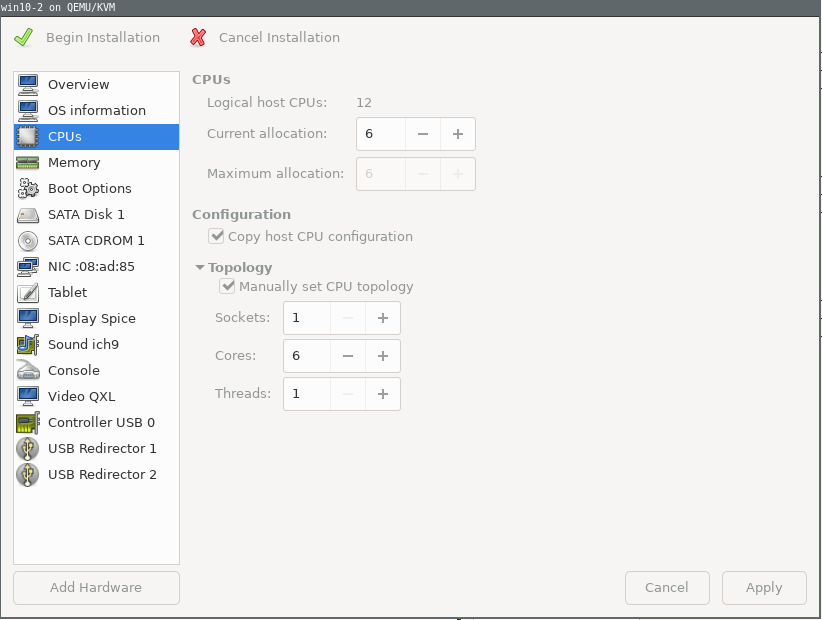
In the CPUs, manually set the cpu topology with 1 socket and cores and threads as your choice, better follow usual configurations of cores/threads
Remove the
Display spiceandVideo QXLfrom the hardwares.Go to
Add hardware, there yoiu will find your passthrough gpu and sound in thepci host devicesection. Add those.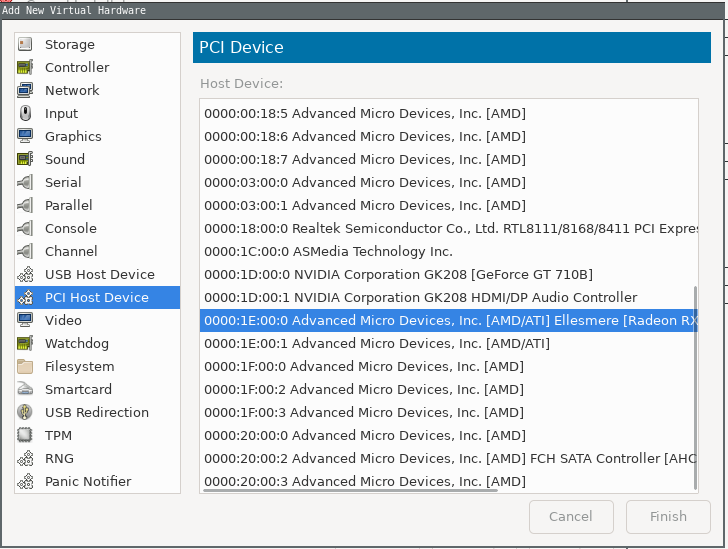
A problem that I faced during installing windows is that I couldn’t boot into the iso file inserted as cd rom and got stuck on the UEFI shell. Going into the bios, I still couldn’t boot from the iso. But when I used BIOS instead of UEFI, it booted into windows installation alright, but going to install windows, it shows that my disk is GPT instead of MBR required for BIOS, and so cannot install windows to that disk.
So, what you have to do is create a windows bootable drive with GPT. You can do this in many ways, either in linux or using a sofware like rufus on windows. Create a bootable pendrive and attach it. Now in the
add hardwaresection, under theUSB Host Device, you will find your pendrive. Add it.
Go to boot options, check
Enable boot menuand in the serial, check and move the USB device(your bootable drive), to the top.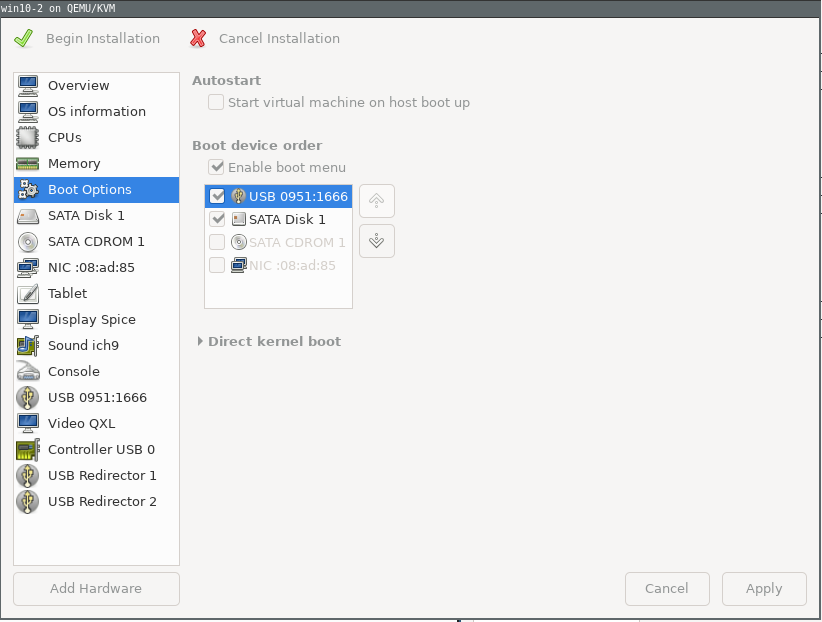
Next, start installation.
Install windows:
Connect a second monitor to you host gpu, or you can connect to the monnitor you already have and can switch the inputs between your host and guest gpu.
The windows installation should come up, install windows and voila! you are done, almost
Install necessary drivers
Performance is supposed to get better if you use virtio drivers on windows, Download the virtio drivers and attack them to the vm as a cdrom device and install the drivers from there.
You must also install the required graphics drivers(Radeon/NVIDIA) to eliminate display issues (in my case , I was not gettint the 1080p resolution).
Editing configurations using virsh
You can edit the config of your vm from terminal by editing the xml
file generate, To edit the xml file, in the termial, type
virsh edit win10 In place if win10, place the name of your
windows vm.
<domain type='kvm'>
  <name>win10</name>
  <uuid>ba67aec1-75a4-4639-b905-2e9c444aef85</uuid>
  <metadata>
    <libosinfo:libosinfo
xmlns:libosinfo="http://libosinfo.org/xmlns/libvirt/domain/1.0">
      <libosinfo:os id="http://microsoft.com/win/10"/>
    </libosinfo:libosinfo>
  </metadata>
  <memory unit='KiB'>8388608</memory>
  <currentMemory unit='KiB'>8388608</currentMemory>
  <vcpu placement='static'>6</vcpu>
  <os>
    <type arch='x86_64' machine='pc-q35-3.1'>hvm</type>
    <loader readonly='yes' type='pflash'>/usr/share/OVMF/OVMF_CODE.fd</loader>
    <nvram>/var/lib/libvirt/qemu/nvram/win10_VARS.fd</nvram>
    <bootmenu enable='yes'/>
  </os>
  <features>
    <acpi/>
    <apic/>
    <hyperv>
      <relaxed state='on'/>
      <vapic state='on'/>
      <spinlocks state='on' retries='8191'/>
    </hyperv>
    <vmport state='off'/>
  </features>
  <cpu mode='host-model' check='partial'>
    <model fallback='allow'/>
    <topology sockets='1' cores='6' threads='1'/>
  </cpu>
  <clock offset='localtime'>
    <timer name='rtc' tickpolicy='catchup'/>
    <timer name='pit' tickpolicy='delay'/>
<timer name='hpet' present='no'/>
    <timer name='hypervclock' present='yes'/>
  </clock>
  <on_poweroff>destroy</on_poweroff>
  <on_reboot>restart</on_reboot>
  <on_crash>destroy</on_crash>
  <pm>
    <suspend-to-mem enabled='no'/>
    <suspend-to-disk enabled='no'/>
  </pm>
  <devices>
    <emulator>/usr/bin/qemu-system-x86_64</emulator>
    <disk type='block' device='disk'>
      <driver name='qemu' type='raw' cache='none' io='native'/>
      <source dev='/dev/sdc1'/>
      <target dev='sda' bus='sata'/>
      <boot order='2'/>
      <address type='drive' controller='0' bus='0' target='0' unit='0'/>
    </disk>
    <disk type='file' device='cdrom'>
      <driver name='qemu' type='raw'/>
      <source file='/home/fmash/gpu_passthru/virtio-win-0.1.141.iso'/>
      <target dev='sdb' bus='sata'/>
      <readonly/>
      <address type='drive' controller='0' bus='0' target='0' unit='1'/>
    </disk>
    <controller type='usb' index='0' model='qemu-xhci' ports='15'>
      <address type='pci' domain='0x0000' bus='0x02' slot='0x00'
function='0x0'/>
    </controller>
    <controller type='sata' index='0'>
      <address type='pci' domain='0x0000' bus='0x00' slot='0x1f'
function='0x2'/>
    </controller>
    <controller type='pci' index='0' model='pcie-root'/>
    <controller type='pci' index='1' model='pcie-root-port'>
      <model name='pcie-root-port'/>
      <target chassis='1' port='0x8'/>
<address type='pci' domain='0x0000' bus='0x00' slot='0x01' function='0x0'
multifunction='on'/>
    </controller>
    <controller type='pci' index='2' model='pcie-root-port'>
      <model name='pcie-root-port'/>
      <target chassis='2' port='0x9'/>
      <address type='pci' domain='0x0000' bus='0x00' slot='0x01'
function='0x1'/>
    </controller>
    <controller type='pci' index='3' model='pcie-root-port'>
      <model name='pcie-root-port'/>
      <target chassis='3' port='0xa'/>
      <address type='pci' domain='0x0000' bus='0x00' slot='0x01'
function='0x2'/>
    </controller>
    <controller type='pci' index='4' model='pcie-root-port'>
      <model name='pcie-root-port'/>
      <target chassis='4' port='0xb'/>
      <address type='pci' domain='0x0000' bus='0x00' slot='0x01'
function='0x3'/>
    </controller>
    <controller type='pci' index='5' model='pcie-root-port'>
      <model name='pcie-root-port'/>
      <target chassis='5' port='0xc'/>
      <address type='pci' domain='0x0000' bus='0x00' slot='0x01'
function='0x4'/>
    </controller>
    <controller type='pci' index='6' model='pcie-root-port'>
      <model name='pcie-root-port'/>
      <target chassis='6' port='0xd'/>
      <address type='pci' domain='0x0000' bus='0x00' slot='0x01'
function='0x5'/>
    </controller>
    <interface type='network'>
      <mac address='52:54:00:e4:b0:ef'/>
      <source network='default'/>
      <model type='e1000e'/>
      <address type='pci' domain='0x0000' bus='0x01' slot='0x00'
function='0x0'/>
    </interface>
    <serial type='pty'>
      <target type='isa-serial' port='0'>
        <model name='isa-serial'/>
</target>
    </serial>
    <console type='pty'>
      <target type='serial' port='0'/>
    </console>
    <input type='tablet' bus='usb'>
      <address type='usb' bus='0' port='2'/>
    </input>
    <input type='mouse' bus='ps2'/>
    <input type='keyboard' bus='ps2'/>
    <sound model='ich9'>
      <address type='pci' domain='0x0000' bus='0x00' slot='0x1b'
function='0x0'/>
    </sound>
    <hostdev mode='subsystem' type='pci' managed='yes'>
      <source>
        <address domain='0x0000' bus='0x1e' slot='0x00' function='0x0'/>
      </source>
      <address type='pci' domain='0x0000' bus='0x03' slot='0x00'
function='0x0'/>
    </hostdev>
    <hostdev mode='subsystem' type='pci' managed='yes'>
      <source>
        <address domain='0x0000' bus='0x1e' slot='0x00' function='0x1'/>
      </source>
      <address type='pci' domain='0x0000' bus='0x04' slot='0x00'
function='0x0'/>
    </hostdev>
    <hostdev mode='subsystem' type='usb' managed='yes'>
      <source>
        <vendor id='0x046d'/>
        <product id='0xc07e'/>
      </source>
      <address type='usb' bus='0' port='5'/>
    </hostdev>
    <redirdev bus='usb' type='spicevmc'>
      <address type='usb' bus='0' port='3'/>
    </redirdev>
    <redirdev bus='usb' type='spicevmc'>
<address type='usb' bus='0' port='4'/>
    </redirdev>
    <memballoon model='virtio'>
      <address type='pci' domain='0x0000' bus='0x05' slot='0x00'
function='0x0'/>
    </memballoon>
  </devices>
</domain>
And thats it! You are done!
Sources
The guide that I mainly followed is this: * (http://mathiashueber.com/windows-virtual-machine-gpu-passthrough-ubuntu/)
A major part pf my guide has been taken from this guide, but as you know, all systems are not the same, and so to get my setupo working , I had to follow somw other resources as well. You must watch the level1tech videos on this topic. They also got an article on this. The resources I used are:
- (https://level1techs.com/article/ryzen-gpu-passthrough-setup-guide-fedora-26-windows-gaming-linux)
- (https://heiko-sieger.info/running-windows-10-on-linux-using-kvm-with-vga-passthrough/)
- (https://scottlinux.com/2016/08/28/gpu-passthrough-with-kvm-and-debian-linux/)
- (https://www.reddit.com/r/VFIO/comments/af71pf/kernel_driver_in_use_amdgpu_instead_of_vfiopci/ee0emkf/)
Videos to watch: 